Lil Celebrations

because even life's lil moments should be celebrated...

  • Home
  • About
  • Recipes
    • Appetizers
    • Breakfast
    • Dessert
      • Brownies & Bars
      • Cake & Cupcakes
      • Cookies
      • Frozen treats
      • Marshmallow Treats
      • Pies & Crisps
    • Drinks
      • Alcoholic
      • Non-alcoholic
    • Entrees
    • Holiday
      • Christmas
      • Cinco De Mayo
      • Easter
      • July 4th
      • Halloween
      • Superbowl
      • Thanksgiving
      • Valentines Day
    • Salads
    • Side Dishes
    • Soup & Chili
  • Celebrations
    • Birthdays
    • Life
  • DIY
    • crafts
    • crafts with kids
  • Contact

Salt Paintings with Emma

September 2, 2017 Leave a Comment

I love to find things I can do one-on-one with my girl Emma.  And now that Lily is here I find it even more important…especially things I can do around the house while the Lilster is napping…

This project came about one morning as we were watching Curious George and Emma wanted to do sand painting just like George did on the show.  Since we had no colored sand lying around, I remember seeing a few posts about salt painting on pinterest and figured I would give it a try.   And let me say, that I am glad I did…it is super simple and a lot of fun (for both of us!) to do…not to mention a pretty cheap activity with simple household items.

All you need is Elmer’s glue, salt, a baking sheet, some paper (I recommend card stock paper as it is a little thicker), and if you have it…watercolors! I just used the cheap kid watercolor palettes but liquid watercolors would work nicely too…I even saw online some people diluted food coloring with water…so there are a few options:).  Emma is 4 now and was able to do all the steps herself  (however I modeled with one of mine below).  I bet she could have even done it as an early 3 year old or possibly a late 2 year old…

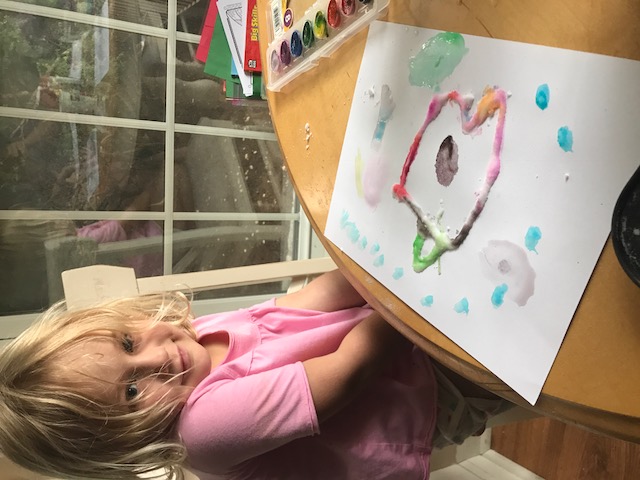
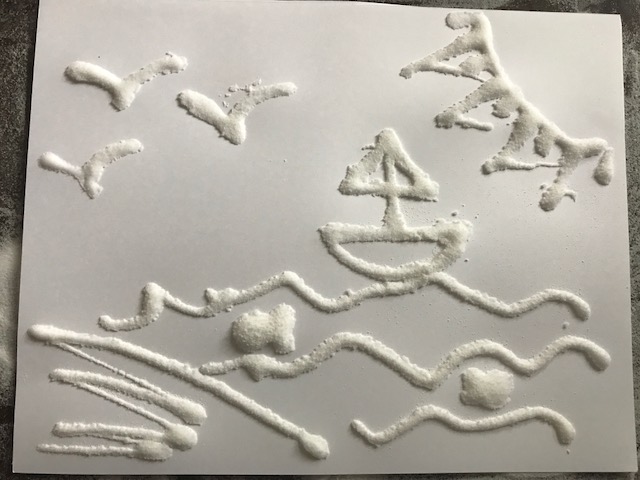
To make the salt paintings you first “draw” your painting on the paper with the glue bottle (if you couldn’t tell I did this one as an example):

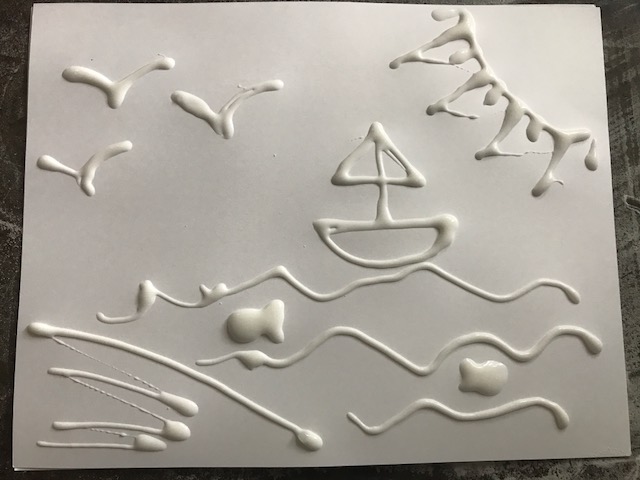
Next, put the paper drawing on a baking sheet (I recommend using one with sides so the salt doesn’t go everywhere) and shake salt all over the painting.

Third, hold up the painting so the excess salt falls off leaving behind a salt painting (or picture at this point!).

Then using your watercolors (or diluted food coloring) paint over the raised salt drawings…and voila!

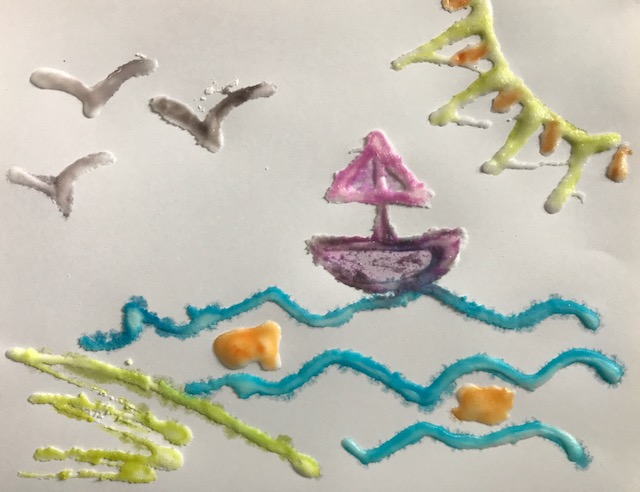
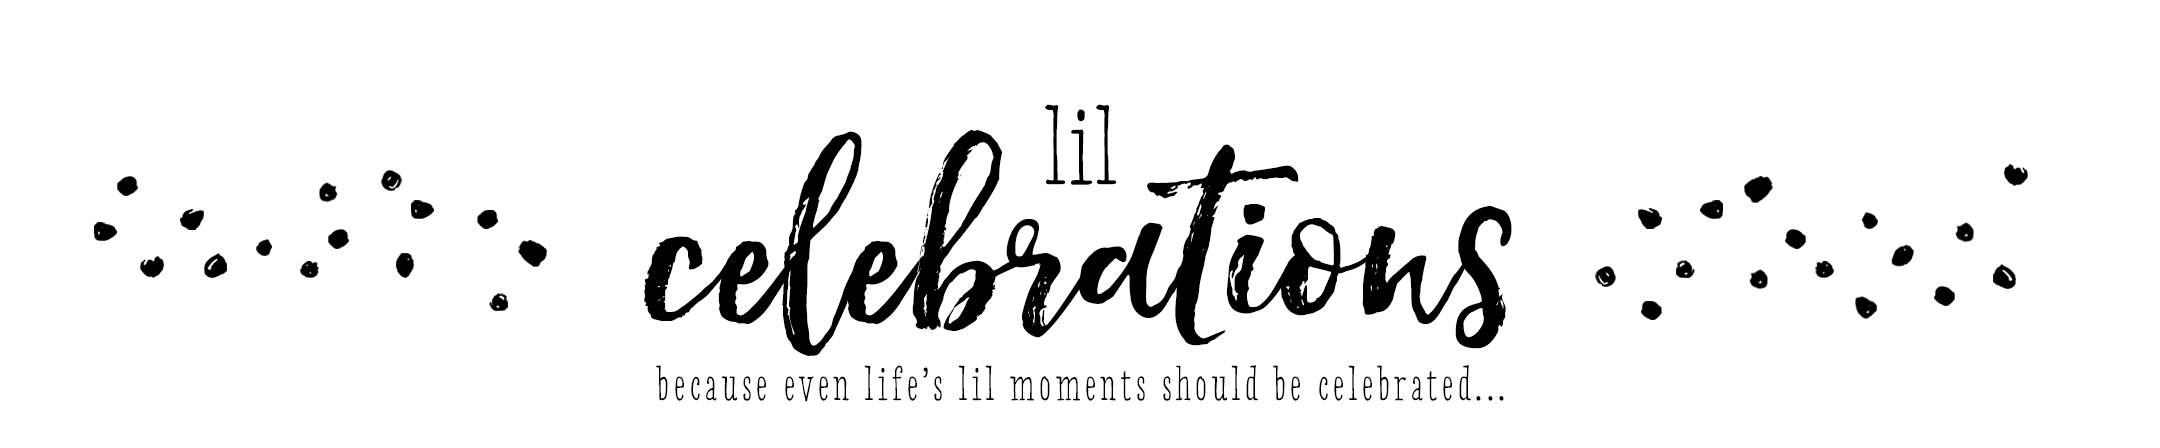
I did this one but Emma had a lot of fun doing a bunch of here own, including this one….

I definitely want to make these again…maybe this fall we will make some pumpkin inspired ones:).

Happy Labor Day weekend!

xo
Lauren

Strawberry Muffins

August 25, 2017 Leave a Comment

IMG_2334
My girl Emma is a strawberry lover like myself and requested that we make strawberry muffins together.   And since I jump at the opportunity to bake with her whenever she feels so inclined AND given the fact that I am always looking for ways to add some more fruit and veggies into her diet I made these muffins several times with her.  They are pretty delicious and easy to make.  In fact I think I need to attempt a third go around now that things are slowly getting back to a more normal state now that Lily is approaching the three month mark!


IMG_2317

So if you are fiending for some fresh summery muffins to savor the last few weeks of summer look no further.  I eat mine without butter but I can imagine they would only taste more fabulous, maybe even with a flavored butter if you felt so inclined….I was dreaming up concotions about what butter I would use as I have been wanting to make my own flavored butter….maybe a cinnamon butter or a lavender butter?!  

But I digress…they are delicious…you should make them!

IMG_2325

Strawberry Muffins
2017-08-24 19:22:01
Write a review
Save Recipe
Print
Ingredients
  1. 3 cups all-purpose flour (14 3/4 oz)
  2. 1 tablespoon baking powder
  3. 1/2 teaspoon baking soda
  4. 1/2 teaspoon kosher salt
  5. 1 tablespoon ground cinnamon
  6. 1 1/4 cups milk (I used 2%)
  7. 2 extra-large eggs, lightly beaten
  8. 1/2 pound (2 sticks) unsalted butter, melted
  9. 2 cups diced fresh strawberries
  10. 1 1/2 cups sugar (10 7/8 oz)
Instructions
  1. 1. Preheat oven to 375 degrees and line muffin tins.
  2. 2. Sift the flour, baking powder, baking soda, salt, and cinnamon together in a large bowl. Stir with your hand to be sure the ingredients are combined.
  3. 3. In a bowl, combine the milk, eggs, and melted butter. ***Make sure to wait to mix the milk, eggs and melted butter right before you throw into the dry mixture in the next step otherwise will harden.***
  4. 4. Make a well in the middle of the dry mixture, pour the wet mixture into the well, and stir until just combined.
  5. 5. Add the strawberries and sugar. Stir gently to combine.
  6. 6. Bake for approximately 20 minutes...the tops should be nicely browned and the cake tester should come out clean.
Lil Celebrations https://www.lilcelebrations.com/
 Recipe adapted from Ina Garten

IMG_2315

Happy Baking!
xo

Lauren


Lily’s Arrival and Nursery!

August 11, 2017 Leave a Comment

Wow! Time has flown! I can’t believe Lily will be three months in 2 weeks!   She was born on May 26th at 1:13pm weighing 7 lbs 11 oz and 20 inches long.  She is such a sweetheart.   And such a relaxed baby… not to jinx myself or anything but right now she is a good sleeper!!! yay!! Lily is busy cooing and smiling right now throughout the day when she is awake… I just love her to pieces (as does her big sister and daddy of course).

FullSizeRender-4

Now that we have gotten back our maternity and newborn photos I put together a birth announcement that I sent out to family and friends above.  I have also finally gotten around to taking her footprints and finalizing her nursery with said footprints and photos!  

I am a big gallery wall fan so of course I had to have a gallery wall in Lily’s room.  I had a lot of fun putting it together.  I tried to get a better picture/lighting but it just wasn’t happening so this is the best I’ve got….

IMG_6468

My favorite corner of the room is the reading corner…the chair is just so comfy and cozy…

IMG_5974

I was originally leaning towards a gold theme for Lily’s nursery but I fell in love with these curtains at R+H baby and found a beautiful rug and sheets that coordinated perfectly so I decided to go with that. I then saw this unicorn rocker at Pottery Barn Kids and was OBSESSED.  Then to top that off on Pinterest somewhere I saw the unicorn wearing a flower crown and since we were going to name her Lily I knew that her unicorn rocker just “HAD” to have a flower crown too.

Unicorn rocker:

IMG_2207

Crib and rocker:

IMG_5978

Little shelves:
IMG_5899

All in all I am really happy with how it came out!  Soon I will have to post pictures from Emma’s big girl room …I am pretty excited to share the dresser that I refinished for her!  I also never posted pictures from her nursery…maybe one of these days:).


Nursery Items:

Curtains

Curtain rods – purchased from Target 4 years ago

Rug

Sheets

Unicorn Rocker

Heart Pillow 

Rocking Chair – I picked this one by testing out all the ones in the Restoration Hardware and Baby store and the Pottery Barn Kids Store…this one I felt was the most comfortable.  I liked how I could rest my head back on the chair too which I knew would be important when feeding the babe 1/2 asleep in the middle of the night!

Crib and changing table- from Pottery Barn Kids 4 years ago

Strawberry Cupcakes with Strawberry Buttercream

May 13, 2017 Leave a Comment

My Emma has a summer birthday but has been talking about bringing in cupcakes for her birthday at school all year so when the “summer birthday party” coincided with my potential hospital stay with baby #2 I asked if we could bring in cupcakes another day. Luckily Emma’s teachers are awesome and said yes:).

Emma is a big strawberry fan (she even has a strawberry umbrella, rain coat and boots!) so naturally she wanted strawberry cupcakes… so strawberry cupcakes it was!  Interestingly enough, when I was Emma’s age I too was obsessed with strawberries…strawberry ice cream, milkshakes, strawberry shortcake and of course, strawberries with sugar were my fav. I also loved the show Strawberry Shortcake!  And I still love strawberries…especially fresh strawberries and strawberry shortcake. YUM!  I guess the apple does not fall far from the tree:).

strawberry cupcakes

ANYWAYS…I took my vanilla cupcake and buttercream recipe and strawberry-ed it up! I made the custard cream as I always do and kept that the same but when it came time to make the cupcakes, I pureed 2/3 cup of fresh strawberries and added that to the batter. Then at the end I added ¾ cup of freshly diced strawberries.  Next time I will be sure to add 1 full cup just to have a little extra as towards the end the last few cupcakes were a little low on diced strawberries.  I also added 5 drops of the “Watermelon “ Americolor red food gel to the cupcake batter to give the cupcakes that nice pink color.

I like to fill my cupcakes up about 3/4 of the way full in the cupcake tins…FullSizeRender-4 copy

Then after they are baked they come out looking like this…

IMG_2761

For the buttercream, I thawed 1 cup of frozen strawberries and pureed them my small food processor and added them to the frosting after I creamed the shortening and butter. Since the strawberries add liquid to the mixture I did not add in water like I normally do with my buttercream recipe. I also added an additional ½ teaspoon of salt from my traditional buttercream recipe as I felt like it needed a little bit more of a salt kick to balance out the strawberries nicely.  I loved the color pink that the frosting became so I did not add any additional food coloring.

IMG_2907

The combination of the cupcakes and frosting together were amazing and I had to show severe restraint to only have 1.5 of them for breakfast. They are truly fantastic and if you are looking for a dessert to make for Mother’s Day tomorrow or just a summery berry cupcake…. look no further…this do not disappoint!  I mean just look at my happy honorary birthday girl!

IMG_3583

Happy early Mother’s Day!

xo
Lauren

Strawberry Cupcakes
2017-05-12 09:23:12
Yields 30
Write a review
Save Recipe
Print
Ingredients
  1. 1/3 cup pureed strawberries (from 2/3 cup of fresh strawberries)
  2. 1 cup of freshly diced strawberries
  3. 2 1⁄2 cups cake flour
  4. 2 cups sugar
  5. 2 cups Italian Custard Cream (see recipe below)
  6. 3⁄4 cup vegetable oil
  7. 2 1⁄4 teaspoons baking powder
  8. 1 teaspoon pure vanilla extract
  9. 1/2 teaspoon of salt
  10. 4 extra-large eggs, at room temperature – Note – EXTRA-LARGE eggs…most baking recipes use large eggs
  11. 1 cup whole milk
  12. 30 - 32 cupcake liners
Instructions
  1. 1. Position a rack in the center of the oven, and preheat the oven to 350°F.
  2. 2. Put the flour, sugar, custard cream, if using, vegetable oil, baking powder, vanilla, and salt in the bowl of a stand mixer fitted with the paddle attachment. (If you don’t have a stand mixer, you can put the ingredients in a bowl, and use a hand mixer with the blending attachments, but take extra care to not overmix.) Mix on slow just until the ingredients are blended together, a few seconds, then raise the speed to low-medium and continue to mix until smooth, approximately 1 additional minute.
  3. 3. With the motor running, add 1 egg at a time, adding the next one after the previous one has been absorbed into the mixture. Stop the motor periodically and scrape the bowl from the bottom with a rubber spatula to integrate the ingredients, and return the mixer to low-medium speed. After all the eggs are added, continue to mix for an additional minute to ensure the eggs have been thoroughly mixed in. This will help guarantee that the sugar is dissolved and that the flour has been thoroughly mixed in.
  4. 4. Add pureed strawberries. Mix until incorporated.
  5. 5. With the motor running, add the milk, 1⁄2 cup at a time, stopping the motor to scrape the sides and bottom between the two additions. Continue to mix for another minute or until the mixture appears smooth.
  6. 6. Add in 5 drops of red food coloring (I used the red "Watermelon Americolor food gel"). Mix until the color is incorporated.
  7. 7. Fold in half of the diced strawberries.
  8. 8. Put cupcake liners in cupcake tin.
  9. 9. Fill cupcake liners with the cake batter. I use an ice cream scoop and put 2 scoops of batter in each cupcake liner until each cupcake is 3/4 way full.
  10. 10. Once have scooped 1/2 of the cupcake batter, add the additional 1/2 cup of strawberries, fold in and then scoop out.
  11. 11. Bake the cupcakes for 20 minutes.
  12. 12. Remove the cupcakes from the oven and let cool. Refrigerate or freeze until ready to decorate.
By Lauren
Lil Celebrations https://www.lilcelebrations.com/
Custard Cream Recipe
2017-05-12 09:24:02
Write a review
Save Recipe
Print
Ingredients
  1. 2 1/2 cups whole milk
  2. 1 tablespoon pure vanilla extract
  3. 1 cup sugar
  4. 2/3 cup cake flour, sifted
  5. 5 extra-large egg yolks – note the extra-large eggs as most baking recipes use large eggs
  6. 2 teaspoons of salted butter- note the salted butter as a lot of baking recipes use unsalted butter
Instructions
  1. 1. Put the milk and vanilla in a saucepan and bring to a simmer over medium heat.
  2. 2. In a bowl, whip together the sugar, flour and egg yolks with a hand mixer. Ladle the cup of milk-vanilla mixture into the bowl and beat to temper the yolks.
  3. 3. Add the yolk mixture to the pot and beat over medium heat with the hand mixer until thick and creamy, about 3 minutes. As you are beating, move the pot on and off the flame so you don’t scramble the eggs.
  4. 4. Remove the pot from the heat, add the butter and whip for 2 minutes to thicken the cream.
  5. 5. Transfer to a bowl. Let cool, cover with plastic wrap and refrigerate for at least 6 hours.
Notes
  1. Will keep for one week.
Lil Celebrations https://www.lilcelebrations.com/
Strawberry Buttercream
2017-05-12 09:25:35
Write a review
Save Recipe
Print
Ingredients
  1. 1 lb unsalted butter at room temperature
  2. 8 oz hi-ratio shortening
  3. 1 slightly heaping cup of frozen strawberries thawed
  4. 3 tablespoons of clear vanilla extract
  5. 3 pounds of confectioners’ sugar
  6. 3 tablespoons of meringue powder
  7. 1 1/2 teaspoons of salt
Instructions
  1. 1. Cream the shortening and butter with a paddle-whip in the stand mixer for 3 minutes on medium-high speed. Stop and scrap the bowl.
  2. 2. Add the strawberry puree. Mix for another minute or two until fully combined.
  3. 3. Add the vanilla extract and salt. Mix until combined.
  4. 4. Gradually add the sugar.
  5. 5. Add the meringue powder.
  6. 6. Beat until the mixture is light and fluffy – 5 to 8 minutes.
  7. 7. Add frosting to the top of the cupcakes with an offset spatula.
By Lauren
Lil Celebrations https://www.lilcelebrations.com/


Lucky Charms Cereal Treats

March 17, 2017 Leave a Comment

Happy St. Patty’s Day!!!

I know I have been somewhat quiet on the blog lately…my 1x a week or 1x per every two weeks post has turned into a once a month post.   If you are wondering why and missed my New Years posting I am now 7 months pregnant (just a lil over 10 weeks to go!!) and I have been way to tired to bake and let’s face it clean up so my posts have been slowly and slowly drifting farther and farther apart.  But it being St. Patty’s Day and I myself being Irish felt the need to rally and post something special to celebrate my Irish heritage!   Granted this is far from a traditional Irish dish but the sentiment is still there!  

lucky charms cereal treats

Being Irish, every year growing up my grandma made corned beef and cabbage for St. Patricks Day, which now that I have my own house and family I do as well.  But of course no meal is complete without dessert!  So for dessert tonight I decided to go for these lucky charm babies as my daughter LOVES the marshmallows in this cereal so I figured she would get a kick out of this dessert and really enjoy it.   And lets face it I can not serve her a guiness inspired dessert just yet soooo marshmallow lucky charms it was!  

To make these I took my traditional rice krispie recipe and just switched the rice krispies out for the lucky charms cereal…simple as that!  And simple this recipe is…a great last minute dessert if you are looking for something to make for dessert tonight or maybe any St Patrick’s Day gatherings you may have coming up this weekend:).  

And seriously, start to finish INCLUDING cleanup and some random internet browsing the whole process took 25 minutes!! 25 minutes folks… that is less time than a TV show!!  I need to remind myself to make these or my favorite rice krispie treats more often!!

So just grab two bags of mini marshmallows, a box of Lucky Charms a stick of butter and 1/2 tsp of salt and you are good to go!  Enjoy!

xo 

Lauren

lucky charms treats 2

Lucky Charms Cereal Treats
2017-03-16 15:26:39
Write a review
Save Recipe
Print
Ingredients
  1. 5 TBS salted butter
  2. 10 cups of mini marshmallows
  3. 6 cups of Lucky Charms Cereal
  4. 1/2 tsp salt
Instructions
  1. 1. Line a 9 x 13 pan with foil and spray with cooking spray.
  2. 2. In a large pan over medium heat melt butter.
  3. 3. Once butter is melted, add in 8 cups of marshmallows (keep the other 2 cups aside for later). Stir marshmallows in the butter until just melted. Remove from heat.
  4. 4. Stir in cereal and salt, until the cereal is evenly coated in the marshmallow mixture.
  5. 5. Now stir in the remaining 2 cups of mini marshmallows.
  6. 6. Pour the mixture into the pan and press evenly (I used wax paper sprayed with PAM). Let your treats sit an hour or so before you start cutting them out to let them set.
  7. 7. Spray your knife with PAM and cut out your treats to serve!
  8. 8. Enjoy!
Notes
  1. I would recommend making them the day you are going to serve them but I have also made them the night before, just be sure to wrap them a couple of times in saran wrap so they stay fresh.
  2. I normally use 2+ bags of marshmallows for cereal treats but this time I only had 2 bags of treats on hand so I measured out my two cups of marshmallows and set them aside and then melted the remaining marshmallows.
  3. And last but not least, make sure your marshmallows are fresh! If they have been sitting around awhile or close to your expiration date your cereal treats will not be as soft and fluffy!
Lil Celebrations https://www.lilcelebrations.com/
 lucky charms treats 3


White Chocolate Heart Lollipops

February 13, 2017 Leave a Comment

Every year I try to make something sweet to go with Emma’s Valentines and now that she is getting a little older I am trying to make something that we can do together.  The past couple of years I have been making cookies so I wanted to go a different sweet direction this year and based upon the sparkly heart Valentines she chose for family and friends I thought that sparkly heart lollipops would go along perfectly!

white chocolate heart lollipops

Granted I can’t ruin the surprise of what Emma’s VDay cards look like (or the ones she made for family and her teachers)…BUT I did want to share the lollipops ahead of time as they are super fun and easy to make!

I made the lollipop part by melting white chocolate melts in a water bath over the stove.  So basically bring the water to a simmer in a big skillet pan and then lower to low heat.  Place a bowl with your white chocolate melts in the skillet and stir melts gently until melted.  You could also melt them in the microwave or in a double boiler situation but I really love this method as it keeps the melts melted for a LONG time and you can just add more melts when you are low/done and remelt again!  Just make sure the water does not get in the bowl with the white chocolate melts or it will change the consistency of the chocolate (and not in a good way!).

IMG_0119

After the melts melted I placed a lollipop stick in the cavity of each lollipop mold and spooned in the white chocolate (approximately 2 spoonfuls filled each heart cavity).  If any chocolate gets on the sides just use a wet paper towel to wipe off.

IMG_0127

I then stuck the white chocolate lollipops in the freezer for 30 minutes and popped them out at the end and made another batch.  While you don’t have to stick the lollipops in the freezer it definitely speeds up the drying process!  And while they were drying I just did other things…you can also keep the water/chocolate on the stove during this time if you are near by and they will be fine!

I made 5 batches of lollipops with 1 3/4 bags of white chocolate melts (I probably could have made 6 batches but I had made 35 lollipops and made more than enough so I stopped there.

IMG_0146

The next day Emma and I decorated the lollipops with edible luster dust.  This was so fun.  Basically I took a pinch of luster dust and a tad of orange extract (unfortunately or maybe fortunately there is no exact measurements for this) to create a liquid paint consistency.  If you don’t get the consistency you want just add a little more extract if you want it to be more liquidy or if too liquidy just add a little more luster dust!  

You could also use lemon extract which has a high alcohol content as well but I thought the kiddos would like the orange flavor the best.  Another option would be to use a clear alcohol like vodka instead of extract but considering these were for kids I did not feel comfortable doing that even though the alcohol itself evaporates. 

IMG_0148

Then get your paintbrushes out and let the decorating begin! (I have specific brushes for painting for baking purposes…you can find baking brushes on Amazon or at a local baking store!).

IMG_0149

These were some of my favorites that Emma made….

IMG_0153

I then let the lollipops dry for 24 hours and packaged them up with small lollipop bags and gold and cream bakers twine.  (I also attached her Valentines which I will share with you on Valentines Day!).  I LOVE how they came out!
IMG_0193

And of course I couldn’t miss out on the fun too…

IMG_0190

Happy Painting!

White Chocolate Heart Lollipops
2017-02-12 19:12:05
Yields 42
Write a review
Save Recipe
Print
Ingredients
  1. 2 bags of bright white chocolate melts
  2. 42 lollipop sticks (4 inches)
  3. heart lollipop mold
  4. luster dust
  5. orange or lemon extract
Instructions
  1. 1. Melt chocolate - take a skillet and fill with water, bring to a simmer then lower to low heat. Place chocolate melts in a dry bowl and then place in the skillet bath. Make sure they do not get wet. Stir over low heat until melted.
  2. 2. Put 1 lollipop stick in each lollipop cavity and fill with approximately 2 spoonfuls of melted chocolate.
  3. 3. Place mold in freezer for 30 minutes or until hardened.
  4. 4. Remove lollipops and repeat until you have the number of lollipops you need.
  5. 5. Mix the luster dust paint...add a pinch of luster dust and a drop or two of extract in a tiny bowl and mix.
  6. 6. Paint lollipops with the edible paint.
  7. 7. Let dry (I dried mine for 24 hours).
  8. 8. Bag or serve! Enjoy!
By Lauren
Lil Celebrations https://www.lilcelebrations.com/
Vendor Guide:

Lollipop Sticks, I got mine at Michael’s but similar ones are found here.  I also purchased small lollipop bags at Michaels, you could also get a complete set of both lollipop sticks and bags on Amazon right here!  Just be sure to get the 4 inch sticks if you are using the same mold I did, the 6 inch ones are too long.

Lollipop Mold

Bright White Candy Melts -I also got this at Michael’s as I think they are a little cheaper there,  but you can find them on Amazon as well right here!

Orchid Pink Luster Dust

Rose Pink Luster Dust

Gold Luster Dust (I had this from a few years back (it lasts forever)!) but a similar one is found right here!

Baking Paintbrushes – I bought mine at NY Cake back when I loved in the city but you can buy a set from Wilton on Amazon.

Orange Extract – I bought mine at the grocery store

See More →

My name is Lauren and welcome to my blog!!  I am so happy you are here!  This is where I share all of the recipes from my family's celebrations both big and small.  Read More...

  • 
  • 
  • 
  • 

Subscribe via Email

Archives

Most Popular Posts!

  • Panzanella Salad with Heirloom Tomatoes!! 17 Jun , 2014
  • Cookies n’ Cream Snow Ice Cream 28 Jan , 2016
  • Pizza Meatball Burgers 06 Mar , 2014
  • Salted Mint Chocolate Cookies!! 22 Sep , 2014
  • Bacon Ranch Cheeseball 07 Jan , 2015

Site Design by Designer Blogs